
 Posts
Posts





Here is the Pattern for the Hacky Sack juggling balls I promised.
The picture are not here. My camera cord is not working and Mountain Man’s computer doesn’t have a memory card reader slot. I don’t have a converter either. When I do I will post this again as an extra post with picture.
While making this I tried a few different patterns and the ball shaped ones made for a oval sack after a few uses. So I went with a disk ends and tube sides style and it worked just fine. Keeps its ball shape after many hours of play.
Crochet Hacky Sack (You can go color crazy. All the knots hide inside.)
Filled with dried beans or plastic pellets.
I used ‘Sugar’ n Cream’ cotton from ‘Lily’ for the larger ones 2 1/ 2 inch, 6.5 cm and size 10 crochet cotton for the smaller ones 1 3/ 4 inch, 4 cm.
Some other people use embroidery thread for this and it looks less dull at first, but using the balls takes care of that new look.
[ ] will hold the extra instructions for the smaller size. All abbreviations are first used in text in ( ) after the word.
Size F hook [Size 0 zero hook]
Chain (ch) 4, slip stitch closed into ring.
(Use fairly tight stitches (sts) so you don‘t loose the fillings.)
Row 1- Ch 2, (this equals first stitch), then single crochet (sc) over chain and tail sc 8 stitches sts into ring. (9 sts) Join with slip stitch at top of first stitch. (Pull on tail string to close hole if too large and knot.
Row 2- Ch 2, sc in same stitch, *(sc X 2) *in each stitch across row. (18 sts) Join.
Row 3- Ch 2, sc in same, *(sc 2, sc 2X in next st.) *repeat 4X, sc 2. (24 sts)
Row 4- Ch 2, sc in same, *(sc 3, sc 2X in next st.) *repeat 4X, sc 3. (30 sts)
Row 5- Ch 2, sc in same, *(sc 4, sc 2X in next st.) *repeat 4X, sc 4. (36 sts)
[Row A- Ch 2, sc in same, *(sc 5, sc 2X in next st.) *repeat 4X, sc 5. (42 sts)]
Rows 6 - 10 - sc in each stitch of previous row. (36 st) [42 sts]
[Row B- Ch 2, sc 5, *(skip (sk) stitch (st), sc 6) *repeat 4X, sk st. Join.
Row 11- Ch 2, sc 4, *(sk st, sc 5) *repeat 4X, sk st. Join.
Row 12- Ch 2, sc 3, *(sk st, sc 4) *repeat 4X, sk st. Join.
Row 13- Ch 2, sc 2, *(sk st, sc 3) *repeat 4X, sk st. Join.
Row 14- Ch 2, sc 1, *(sk st, sc 2) *repeat 4X, sk st. Join.
Add Beans, I used soy beans, but you can use pony beads or other plastic beading/ stuffing sold at craft stores.
Row 11- Ch 2, *(sk st, sc 1) *repeat 4X, sk st. Join.
Cut 5 inch tail.
Here I add as many beans as I can get into the little hole to make it fairly tightly filled. (In a short time of use it will feel a lot looser.)
Take the tail and pull it through the other side of the hole and pull tight then knot to close and tuck tail inside.
Addition: You can make a size in between using the size 10 crochet cotton and zero hook and pattern, by adding five more rows; two more increase and decrease rows and another plain row in between. (Going smaller with the Sugar’ n Cream and size F hook pattern didn’t work as well.)
Showing posts with label How To. Show all posts
Showing posts with label How To. Show all posts
Wednesday, July 28, 2010

Wednesday, June 23, 2010
On Summer Pinwheel Fun:

Summer made its new start this week and I have for your pleasure ‘Pinwheels.’

Directions here will make pinwheels about a foot across. Smaller paper squares will make smaller pinwheels.
I used card stock paper, but you don’t have to. Color of your choice. (My black one doesn’t show for pictures well, so I used pink here.)
A straight pin.
A bead or two for washers, it helps to spin faster.(optional)
Pencil with good eraser, (not too hard for sticking the pin into)
Scissors and something to mark cutting lines.
To make a Pinwheel.
1 Fold one corner up using the other corner as fold line point. (Do Not cut into a triangle shape.)

2 Mark a line to cut off extra paper and you should have the needed square when opened.
3 Cut off extra paper.
4 Fold the other direction so there are fold lines from each corner and through the center.
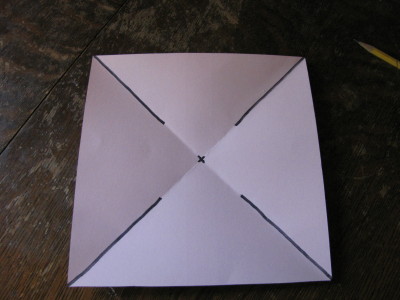
5 Mark center with a dot and two thirds of each fold line leaving the center portion unmarked except center point, mark tip ends only.
6 Cut on fold lines.
7 Decide on clockwise or counter clockwise spin.
With the top of square facing you the left point is counter clockwise and the right point is clockwise. (Only one direction can be used at a time. I used right side in the pictures.)

8 Mark points to be folded in, turning paper and mark each side on the same point.

9 Taking the pin (with one bead on it if you are using them) bend marked points in toward the center and poke the pin through each of the four point layers, (You will be poking through the back of the marked point) then through the center point mark.
10 Place second bead, if you are using them, onto the pin.
11 Stick Pin into the pencil eraser.

12 Face pinwheel into the wind and watch it whorl around.
Extra: To make the two colored kind, place two different sheets of paper of different colors together. Glue at center point and make the same way as before. You can even get the kids to color the paper first for one of a kind pinwheels.
Saturday, May 1, 2010
On Sitting Back and Enjoying the Day:
It is the first of May. Today, I’m taking the easy way out. I’m making Green Bean Soup.
What is Green Bean Soup, you ask?
At my house it is cooking up some green (wax) beans (or both), adding water to more then cover them, and adding cream cheese, 2 oz. per quart, stir until melted and salt to taste. Easy-peasy, kid friendly recipe!
It’s amazing what kids will eat when they make it themselves.
This can also be put through a blender and liquefied if you like. An alterative to Tomato Soup. We serve it up with sandwiches or a salad.
What is Green Bean Soup, you ask?
At my house it is cooking up some green (wax) beans (or both), adding water to more then cover them, and adding cream cheese, 2 oz. per quart, stir until melted and salt to taste. Easy-peasy, kid friendly recipe!
It’s amazing what kids will eat when they make it themselves.
This can also be put through a blender and liquefied if you like. An alterative to Tomato Soup. We serve it up with sandwiches or a salad.
Friday, April 9, 2010
On Goth a Skirt, How To:

I like to change up my clothing. Partly because I am and have been loosing weight, all be it slowly, and partly because I don’t like to spend extra money if I don’t have to.
I like to make extras that can be easily added or removed from a dress or top and skirt and reused on something else at another time. Over skirts and tops that add interest without adding too much money, time or weighty layers are the way I like to go.
You can use this over skirt pattern in anyway you like. It is great for a princess, ballerina, or fairy costume in bright or pastel colors. You can wear it over pants if you like and it looks great over a short skirt if you can put it off. Just go with what feels right to you. More ideas on Youtube here.
I used black so it will go with all my clothes. You can go with the color or color combination you like.
I made mine in about an hour, so I’d say if you’ve never made one before it should take no more then three hours for someone new to crafting.
You’ll need:
Elastic - waist length, or ribbon - long enough to tie around the waist and still make a bow, unless you add a hook and eye closure.
Tulle material, (that is the netting you see brides veils made out of. It comes in a lot of colors.) At least 4 yards, more if you want it longer or fuller. Tule runs from about 99 cents a yard to 7 dollars a yard. I usually get the $2.00. This $2.00 kind is not too stiff like the cheaper stuff and not too expensive when using a lot of yards.
Ribbon. Lots and lots of ribbon of different widths and lengths. Different looks are good too. Velvet, grosgrain, satin, patterned, what ever you like as long as it is not the wired or the craft kind for packages or floral arrangements, that stuff comes apart too easily, can‘t be washed and sometimes the color runs if it gets wet. You can get bargain ribbon in lots of places other then fabric stores. Try craft stores, second hand shops, close out stores, flee markets, department stores, church jumble sales, or even raid your grandmas basket of left over sewing goodies. Ask first so she can still respect you even if she doesn’t like the look.
Scissors - to cut the fabric and ribbon.
Needle and thread to close the waist elastic into a circle, some people just tie it off, but I don‘t like the knot poking me or showing.
There is a tutorial here and here for making the tule or netting part of the over skirt. And you can use the instructions for the ribbon part in the same way for the front of the over skirt.
Put all the netting strips in the back and sides of the waist with the ribbon strips in the front for the look I have. You can do your own thing if you want. Just remember that if you mix it up with the ribbon here and there, the ribbon will tend to make its way to the inside and the netting will cover it, making you have to pull it out every so often if it is going to be seen.
If you are not into video, you have a slow dial up connection, or just like to read it over first, Here is what you do.
Make a circle of elastic to fit your waist. Making sure it is not too tight and will stretch over your hips so it can go on and come off easily over your other clothing. Sew it closed or knot it tightly.


Measure the tulle fabric to be twice the length you want the over skirt to be. Ankle length - you go from your ankle to your waist and back down to your ankle again. The same for your mid calf, knee or mid thigh. I used ankle, knee and a knee length with one tail longer then the other to make one side of it med thigh and the other mid calf, thus a combination of lengths all mixed up. I’m fat so yours will probably be thicker with the same amount of tulle. Then again I’m also short.
After you cut the length, you are going to cut this into strips. The easiest way to cut it is to fold it lengthwise or end to end (not side to side) a few times. Cut this in strip pieces about three inches wide or about the width of your hand without the thumb.

Take the strips and find the middle of each strip or there about and lay the loop end under a section of the elastic waist ring. Now take the ends of your strips and run them through the loop end of the strip around the elastic ring. (Pictures are of ribbon so you can see it better.)


Use the same directions for the ribbons, but it is best to cut the ends of the ribbon on an angle or a ‘V‘ cut so it doesn‘t unravel and trip you. So that’s, twice the length and then fold in half, loop under and ends through the loop around the waist ring.
You can wear this over any dress, skirt or pants and move to a goth look in seconds from your school, work or grandma friendly wear.
Subscribe to:
Posts (Atom)